Isn’t it too boring to keep clicking on your Chromebook’s screen to get your task done? This tiring, boring, and monotonous job can now be done without even touching your mouse or keyboard as an Auto clicker can do this for you. Chromebooks were first introduced to provide relevant ease, speed, and comfort to users and thus laden with a certain amount of automated features, and Auto clicker for Chromebook is one of them.
An auto clicker is a tool that is designed to automate your mouse click when your cursor remains steady for a certain point in time. It is an efficient tool to make continuous clicks while playing games and using applications that require you to click repeatedly. With an auto clicker, you can get some rest, focus on other tasks, and keep your physical mouse aside. There is no limitation on clicking as the algorithm of the tool allows it to make as many clicks as required to complete a task.
An Insight Overview of Auto Clicker for Chromebook
Having a device like Chromebook enables you to use various automated tools that can improve your productivity without making any additional effort. When working on computing devices, we spend most of our time clicking here and there and often get tired and bored of it. But, Chromebook users get an edge as they have an auto clicker, especially designed for them to perform the tiresome clicking in a repetitive fashion.
When you are performing a task that requires you to click the mouse and keyboard keys in quick succession, and the speed of pressing which is also known as CPS (Clicks per Second) is of great importance, an auto-clicker for Chromebook makes complete sense to you.
With an auto clicker installed on Chromebook, you can dramatically increase your CPS rate and establish an unmatched clicking speed. An auto clicker provides you with a speed that is not achievable through manual clicking. Moreover, it works more efficiently than your physical mouse as it is designed with better targeting abilities. So, whenever your mouse stops making clicks for a certain period, the auto clicker takes over the job and starts making automatic clicks on the screen.
Why Do We Need the Auto Clicker for Chromebook?
As it is known, Chromebook is all about providing convenience and comfort to users. The Chrome OS is designed to process faster with related ease. Thus, it supports various equipment that can get the job done more effortlessly within the least possible time, and one such tool is the Auto clicker for Chromebook.
An Auto clicker for Chromebook is a specially designed tool that makes the job of repeated mouse-clicking, automated. When you are tired of clicking on the mouse in a monotonous fashion to maintain your CPS rate, the Auto clicker will come in handy as it will not only maintain but increase the CPS rate in an efficient manner.
One fine example of the use of an auto clicker is to improve clicking speed while playing online games. In simpler words, most online games require you to click at a brisk speed, and when manual clicking becomes tiresome, you can take resort to the Auto clicker tool which will automatically click as many times as it needs.
Few other uses of an auto clicker for Chromebook are mentioned underneath;
- From building blocks in Minecraft to repeatedly shooting in World of Warcraft, Auto-clicker is a blessing for all game lovers who have their ChromeBook filled with games that require constant clicking of a mouse. Above all, an auto clicker helps you efficiently shoot at the target and score better.
- Another use of an Auto clicker for ChromeBook is for finding in any software of the device. A few random automatic clicks on the interface of the program can help you determine the reaction of the program.
- If you use your Chromebook for the work of Data entry, the auto-clicker will aid you to shift from one cell to another in a faster manner. Also, when copy-pasting of similar data is required, auto-clicker can save you from the hassle of consistent typing.
- The next thing where an auto-clicker can help Chromebook users is remaining active on the screen. Hence, when you are away from the screen but don’t want to be shown as idle or offline, you can add an Auto clicker to your Chromebook. It will automatically click on your screen after a specified time interval so that you look active on your screen.
- If you are a shopaholic, and always on your toes to grab flash online deals, auto-clicker will get you deals you have always dreamt of. If you are on a shopping site, which needs instant clicks to redeem, get a Chromebook auto-clicker.
- Last but not the least, the auto clicker on your Chromebook can automatically refresh the web page you are using. So, if you are constantly clicking the refresh button to get an email, link, or more, let the auto clicker click for you.
Apart from the aforementioned uses, there is a lot more which you can use your auto clicker for. If you want fast clicks on the screen for anything, you can automate it using an auto clicker and raise your CPS rate.
Benefits of Auto Clicker for Chromebook
- Most auto clickers are free of cost and available on most web stores. All stores are consistently updating their database, and you can find any sort of tool you need to get your clicks regulated.
- Many tools are saved in the toolbar at the top of your screen, from where you can track your clicks and drags.
- These tools are multipurpose and work with most of the applications installed on your device, even with the web pages.
- It allows you to perform a variety of tasks at one moment. Furthermore, it helps you perform complex tasks without much hassle.
- Chromebook auto clicker is an easy-to-use tool that works with any interface. Hence, it is perfect for beginners.
- It is best to save your time and energy and put your physical mouse on the much-required rest.
Ways to Download an Auto Clicker for Chromebook?
Way 1: Enable the In-Built Auto Clicker for Chromebook
Most Chromebook users might not know that their in-built cursor can be set up to take automatic action when there is an activity for a particular time span. This feature was first designed for users with motor impairments.
Wondering how you can turn on the Automatic clicker feature on your Chromebook? Simply follow these steps:
Step 1: From the bottom right corner, select “Time” or press and hold
“Alt + Shift + s” from your keyboard.
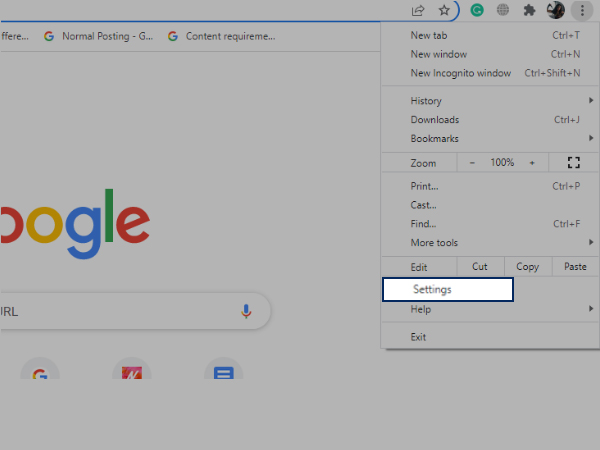
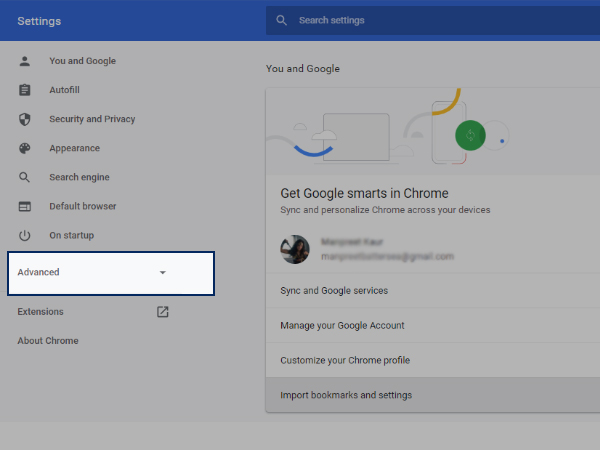
Step 2: Open “Settings” and then click on “Advanced”.
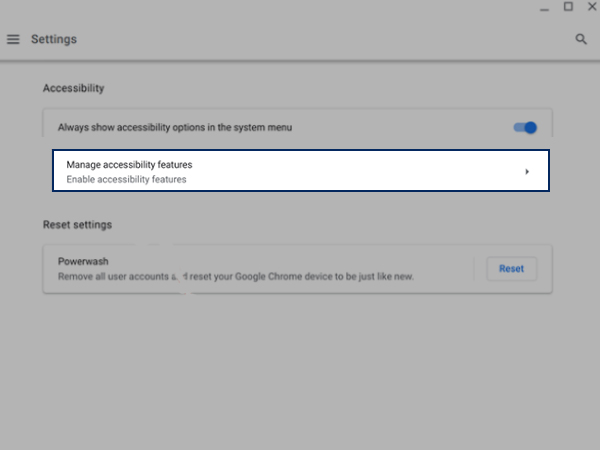
Step 3: From the “Accessibility” option and choose “Manage accessibility” features.
Step 4: Now, explore the option of “Mouse and touchpad”, select “Automatically click” when the mouse cursor stops.
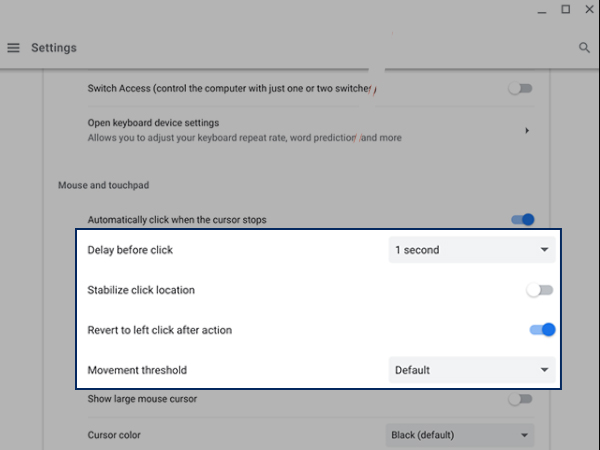
Step 5: You can even customize your automatic click settings, but it is completely optional:
- Delay before click: Select how long you want your Chromebook to pause before it starts clicking automatically.
- Stabilize click location: To keep your ring confined to one place until your mouse cursor moves outside of it.
- Revert to left-click after action: Automatically return to left-click after other actions, like right-click or double click.
- Movement threshold: When you want to click items that lie in a certain range, you can also adjust the size of your ring.
If you want to start clicking without physically pressing any key or your mouse, just point towards the object that you want to be clicked.
How to Use Different Types of Clicks
After you turn on automatic clicks, you can customize the actions your clicks take.
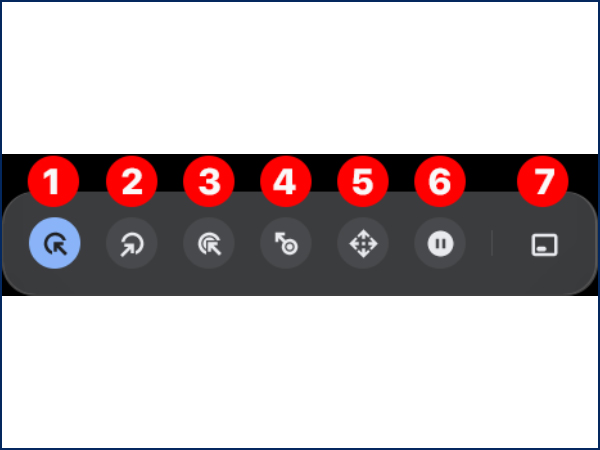
- At the bottom right, choose an action from the menu:
- Left-click ⬉
- Right-click ⬈
- Double-click ↟
- Click and drag ⚨
- Scroll ✥
- Toggle menu position ⚁
- Point to where you want to perform the action.
To stop automatic clicks, select No action (pause) .
Scroll As you Hover the Mouse
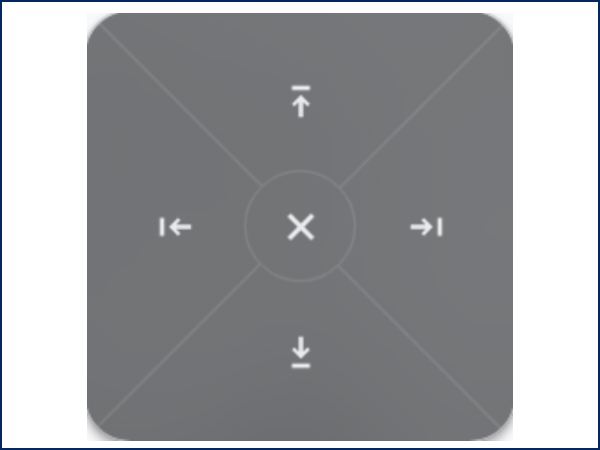
Step 1: From the automatic clicks section, go to Scroll ✥. You will see another menu appearing on the screen with scroll options.
Step 2: Point to the scroll option that you want to select:
- Left ⇐
- Right ⇒
- Top ⇑
- Bottom ⇓
- Close ✖
Step 3: Now point to the scroll option that you want to perform.
Tip: For changing the location of scrolling, hover over the new scrollbar or page and wait till the scroll menu moves to that particular area.
Way 2: Use Auto Clicker for your Chromebook Browser
If you want to download an auto clicker on your Chromebook for making the automatic clicks on the web pages, you can get one for Google Chrome. But to start with, you need to install the CTG Plugin extension first on your browser.
Once you are done installing the extension, you need to access all those websites for which you need your auto clicker to work, and then configure the settings that will help you enable the tool as per your needs. This auto-clicker will only work for your browser and will not work for your device when the browser is not enabled.
We have already discussed the Way above how you can use an auto clicker for your device by using the Chromebook’s settings of automatic clicking.
Well, let’s move to the steps using which you can install an auto clicker for Chrome browser:
Step 1: Open the “Settings” of your Chrome browser by clicking on the three dots you can see on the top-right corner of the screen.
Step 2: Click on the “Advanced” option from the left menu bar and a new menu of options will appear.
Step 3: Select the “Accessibility” option.

Step 4: Click on “Manage Accessibility Features”
Step 5: Now, from the “Accessibility” menu, select the “Mouse and Touchpad” setting.
Step 6: Now, from here toggle the switch for an option called “Automatic Clicking when the mouse pointer stops”, to enable it.
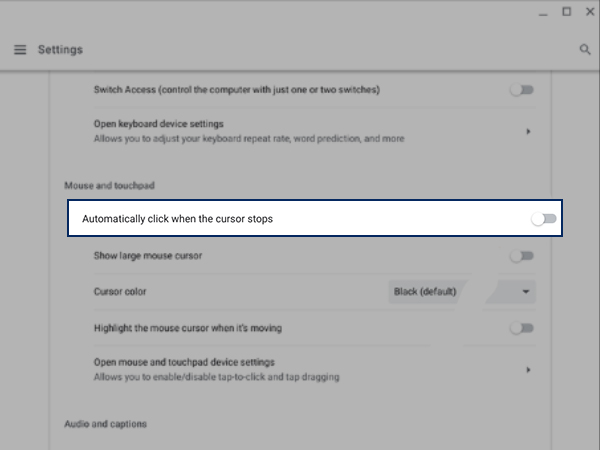
Step 7: After you are done enabling this feature, you will see a ring appear right next to the cursor, on your screen. So, whenever your cursor will not move for a certain time, the auto clicker will enable and start making automatic clicks.
The Functioning of Auto Clicker for Chromebook
If you have installed an auto clicker and now need to know how the Auto clicker for Chromebook works, you must understand that after setting the auto clicker, it will automatically start making the clicks whenever your cursor stands still for a certain duration. However, you can customize some of its settings to make it work as per your requirements.
- Delay Before Click
The first thing that you must determine is, the time gap between the mouse cursor stopping and automatic clicks taking over the job. To customize this feature, click on the “Delay” option and choose the time duration from the drop-down menu. The range lies between 0.6 to 4 seconds.
- Stabilize Click location
This option helps you keep your ring stabilized, and enabling this option will keep your ring stabilized until you will purposely move it out of the cursor.
- Movement threshold
This allows you to set the length of the cursor movement. In simpler words, you can determine how far will your cursor move before pausing and from where the automatic clicking will start.
There is an option to customize the movement threshold, you can easily increase or decrease the movement threshold, by selecting what you want to be, the options that you get are:
- Extra Small,
- Small,
- Default,
- Large,
- Or ‘Extra-Large’.
- Always Revert to left-click
With this option enabled, the click action will automatically shift to left-click after every action. But it can be changed to different actions such as right-click and double-click.
Here are all the options which you can select from:
- Right-click,
- Double-click,
- Scroll,
- Clicking and dragging,
- Pause,
- And toggle menu position.
If you want to control the scrolling of your mouse, go to the Automatic Clicks Menu and click on the ‘scroll’ button which will display 4 arrows pointing in 4 different directions. Another menu will open from where you need to select the direction in which you want your scroll action to point- left, right, top, bottom, or close. For amending the scrolling settings, hover the cursor over the scrollbar so that it can move in the direction where you want it to be.
Conclusion
For all the Chromebook users who are fond of gaming or involved in a profession that demands a wearisome act of repetitive mouse-clicking, you must auto clicker a try as it can cut out the efforts and make your tasks easier and more efficient. Now, the task of continuous clicking can be handled by the auto clicker and you can achieve the maximum CPS rate without even touching your physical mouse.
Frequently Asked Questions
Can I get an auto clicker for Chromebook?
There is a wide range of auto clicker tools available for Chromebook, You can find the best suitable and download it on your device as you do with any other software. However, Chromebooks have inbuilt auto clickers as well.
Does the auto clicker for Chromebook have a virus?
Typically No, auto clickers do not have viruses. It is an authentic application that is designed to boost and regulate clicks. It is sans all malware, virus, and other security threats.
Is it free to use Chromebook auto clickers?
Yes, Chromebook auto clickers is a macro or software that is available for free in most web stores. It is meant to automate mouse clicks and comes for free.
Is auto clicker for Chromebook safe to use?
Needless to say, the auto clicker for Chromebook is completely safe to use. However, several games can ban you from using an auto clicker because it will be considered cheating, other than that it is completely safe on your device and causes no such harm. But, make sure you are using it in a limited manner to avoid being blocked from a game.